Friday 14 September 2012

Disaster - Tank Overflowed

It has been raining heavily for the past few days. Which means raining season has arrived and that means bad news for my aquaponics system. In the past, the storms in my area had drowned my seedlings, damaged my plants, carried my guppies into the drain outside my house, uprooted big trees, blew roof tiles off houses, and damaged my verandah.

Yesterday, I found 2 tilapia laying motionless at a very wrong place:


A group of black ants collectively planning out how to dissect this piece of flesh
No ants on this one
Palm sized tilapia. Could have been fresh on my dinner plate.
Normally, my system works fine under heavy rain and all. Any extra water will flow out through the overflow at the side of the tank. But things are different now, I have an additional grow bed which adds to the surface area collecting rain. The tank outlet, which has strainer holes, probably got clogged by poop and couldn't let water out faster than the input from the rain. Over time, the water level will rise till the rim of the tank. Also with the addition of the second grow bed, there is a rare chance of both grow beds flushing at the same time. When this happens, the tank water will rise by 10 centimeters in less than a minute. With the water level already at the rim of the tank, a double flush will create a surge strong enough to push even large tilapias out of the tank.


Although there is a slight rotting smell, they looked fresh with their gills still red. I decided to freeze them to make food for stray cats in the future.

Thanks for reading!

Thursday 6 September 2012

New Grow Bed - Putting it all together

With all the components ready, I assembled the new grow bed today. I'm too tired to type now, so I'll just present some pictures along with some descriptive text on the construction process.

I begin by positioning the grow bed at the desired position.

Positioning the grow bed
 Next, I fixed the strainer pipe at the bottom of the tank

A 25 mm hole drilled at the center
Fixed a bulk head fitting together with the strainer holder
Strainer pipe held securely by the strainer holder
I then filled the bottom 3 inches of the grow bed with river pebbles. This is to provide extra drainage at the bottom to minimize anaerobic zones.

The gap in between the strainer pipe and the tank floor is narrow enough to not let any pebbles through.
I used water as a guide to help me level the pebbles.
 Next was the washing of 3 bags of new expanded clay balls. Bought them for RM70 per bag.


I learned a convenient way to wash them from the Backyard Aquaponics forum. Just fill the bag with water until full. Shake it. Then poke some holes to drain the water out.

Make a hole at one corner and insert a hose into the bag. Start filling it with water.
Poke several small holes at the bottom to release the dirty water.
 Once cleaning is complete, I poured them into the new grow bed.
Aaah~~! A new grow bed filled with fresh growing media!

Virgin Grow Bed!
 I then thought about utilizing that empty space underneath the new grow bed. It's a nice shady place protected from falling tree debris from above. The guppies would love it there.

A new location for my guppy tank.
Guppies now enjoy clean water directly from the grow bed. Excess water is drained back into the tilapia tank.
A Tee-connector divides the water flow in to both beds.

Thanks for reading!

Wednesday 5 September 2012

New Grow Bed - Grow Bed Stand

In this post, I will explain how I construct my grow bed stand. Like most DIY-ist out there, improvements from previous design is a must. My previous stand was made out of slotted angle iron and was designed badly with various newbie flaws. The new grow bed stand will also be made from angle iron but without those flaws.


Some Tips on Slotted Angle Iron...

Before I talk about my grow bed stand construction, I would like highlight a few things I learned when constructing my previous growbed stand:

Notice that a slotted angle iron bar consists of segments repeated throughout its length. Each segment is precisely 3" long. The red lines in the picture below marks the locations where cuts should be made. Due to this, it is important that all the dimensions in your design are in multiples of 3 inches. For example: 21", 30", 9", 63", etc...
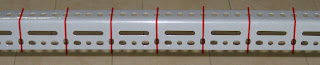
Cutting points
When buying them, most hardware shop sells them in 10 feet bars only. That means one bar consists of exactly 40 repeated segments - no little extras at either ends! Before going to the shop, write down the number and lengths of all the pieces needed in your design on a piece of paper then plan out a cutting strategy that uses the least amount of full length bars and minimum wastage. At the shop, they will either let you use their cutting tool to cut them yourself or you can provide them with your measurements and have them cut them for you.

When cutting them, try to cut them precisely across the center of the oval hole at the cutting point. Too much error may prevent the holes from aligning properly when forming corner joints. For the sake of precision, I prefer to cut them myself. I don't trust the hands of others.

A cut made at the cutting point
A worker at the hardware shop I purchased these said that my cutting style is wrong. Well, I learned this tip from a website of a company that manufactures slotted angle iron!


Grow Bed Stand Construction

Materials:
4 x 30" slotted angle iron
4 x 21" slotted angle iron
6 x 36" slotted angle iron
4 x angle iron rubber caps
16 x corner brackets
60 x nuts & bolts

* notice that the lengths of all the angle iron are in multiples of 3".
* total angle iron purchased: 4 x 10 feet bars


I didn't took any pictures during assembling so here's a picture of the final product:


Pretty neat isn't it?
It looks a lot better than my previous stand. All the corners looks perfectly square. It looks like I could even lay a piece of plywood at the bottom section.


Thanks for reading!

Tuesday 4 September 2012

New Grow Bed - Siphon Strainer

It has been months since my last update. Lots of bad things happened to my system - powdery mildew on okra, potassium deficiency, unexplained guppy deaths, and a dead plecotamus. The pleco was my favourite fish and I still couldn't find a proper place to respectfully bury it so I froze its body in the freezer.

I am now constructing a second grow bed to double the filtration capacity of my current system. In this post, I will roughly show how I designed my siphon strainer. My siphon design is based on Affnan's time tested mini siphon design. I also designed a strainer holder as I do not like the idea of gluing the strainer to the bottom of the grow bed.

I am a perfectionist and I love geometrical symmetry and patterns. To make sure my design is "perfect", I drew guide lines using a mechanical pencil to mark the points where I will be drilling or cutting. I measured them precisely to the limits of my visual acuity. I used various techniques to draw those parallel lines on the pipe. I also figured out a way to obtain the very center of the end cap. There are a total of 4 x 16 holes on my strainer each 10mm in diameter. A chose a triangle design for the strainer holder to minimize obstruction.


To make perfectly aligned holes, I start by drilling 1mm diameter holes precisely on the marks. I then gradually increase their size by using larger and larger drill bits until I reach the desired 10mm diameter size. Drilling the holes using the largest drill bit right away will cause too much slipping as I am using a hand held power drill.

The end cap is cut using a hacksaw with a piece of straight wood used as a guide. The hole in the middle is cut out using a 25mm holesaw.


I removed all access plastic using sandpaper and grind stones. I used an orbital sander to speed up the process. Erased any remaining pencil lines using an eraser. Any stubborn price tag or sticky tape glue can be removed easily using lighter fluid or paint thinner.


I drilled a drip hole on the bulkhead fitting as advised by Affnan. I then removed a piece from the bottom end of the short 20mm pvc pipe so that the drip hole is not blocked by it. I can also close the drip hole simply by rotating the pipe.


Finally, I tested my strainer holder design by assembling all the parts together. The modified end cap is able to hold the strainer securely without obstructing the holes too much. Measuring precisely pays off!


Thanks for reading!